

Let's Make A Lovely DIY Leather & Pumpkin Centerpiece

We are well into Autumn and Thanksgiving is just around the corner. It’s time for everything to have a touch of fall colors and warmth for those shorter days and longer nights. I can’t think of anything better than a combo of candles and rich colored leather.
If you are looking for an easy fall craft to decorate your holiday dinner table and bring in that much needed warmth, you’ve found it!
Let’s get started!

Supplies Needed:
Leather Scraps (chrome or veg tanned, I used our Tried N True leather for this)
Leaf Template (or free hand them)
Scissors or Utility Blade
Pen or Marker
Water Container
Tea Candle Holders
Candles
Pumpkins
To kick off our leaf leather craft, you will need a leaf! Whether you bring one from outside, print one from the internet, or hand draw your ideal size and shape, you’ll want that template handy to transfer the shape to your leather scraps.
Putting your leaf template on card stock is ideal, but not necessary. However, the thicker paper holds up to multiple uses and tracing.

When you have your leaf shapes ready to go, it’s time to lay them out on your leather and trace them. Use a pen or marker to mark your lines. If your leather is light enough in color, a pencil will work just fine.
Once you’ve traced your shape, grab your scissors and get to cutting. If you used a marker or pen, cut inside the lines so you don’t have any dark marks on your finished leather leaf.
Cut out as many leaves as you want to use for your decor. Once you're done, you can move on to the leather molding!
Wet molding leather isn’t as complicated as it may sound. This is a very simple introduction to it! Get yourself a bowl or large glass and fill it with warm water. You will be submerging your leather in this water, so be sure not to fill it to the rim!
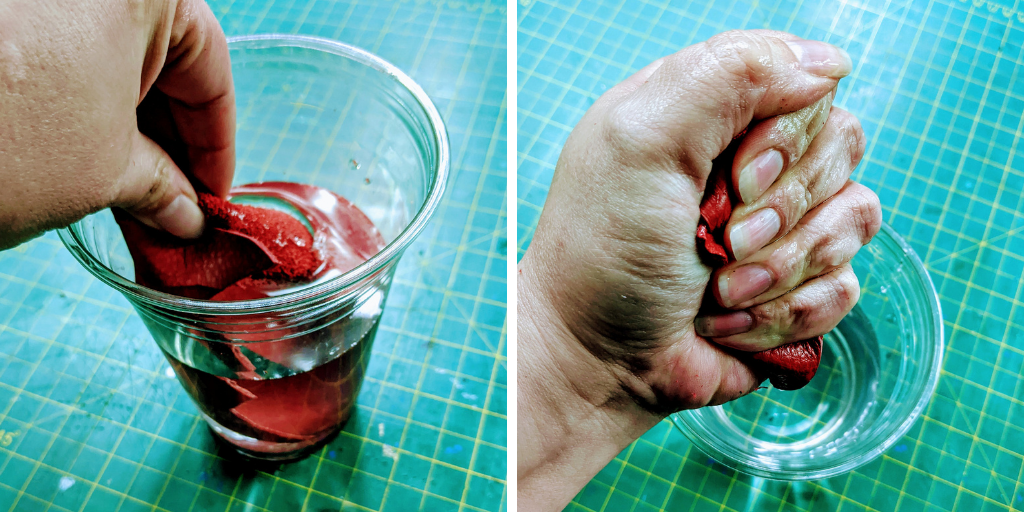
Take your leaf, and submerge it completely in the water. A few quick dunks, should more than suffice for this project.
If you are using Vegetable Tanned leather, be sure not to oversaturate the leather as this can lead to unwanted stretching and warping.
If you are using a soft chrome tanned leather, you can crush the leather into a ball to wring out some excess moisture. This will help it dry a bit faster but also give your leaf shape a bit more of a wrinkled appearance.

Take your tea candle holder (in my case I am reusing some empty yogurt jars...recycle where you can) and flip them over, upside down. This will be the form you use to help your mold your leather into a cup shape. If you don’t have any glass jars or tea candle holders, you can use an upside down muffin pan and get the same shape!
Drape your wet leather over the holder and smooth it down around the sides. If you want the cupped shape to be severe, you could put a rubber band around the leather and the form. Otherwise, the leather will flare out a little as it dries and contracts.
If you want the leaf to bend in certain ways, fold it over and pin it in place. Experiment a little with different ways to get flowing soft shapes, or hard lines.
Now comes the drying. Here, you just need a little patience. You want to let the leather get completely dry before you finish the pieces. Flipping them over before they’ve dried will lead to them falling flat.

If patience isn’t a virtue of yours, there is a slightly faster way to dry your leather. If you remember, I mentioned using an upside down muffin pan to help you shape your leaves. If you went this route, you can actually place the leaves and the muffin pan in your oven at a low temp (don’t go higher than 350 degrees) and bake the moisture out of them.
This is not a “set it, and forget it” situation though. Be sure to keep an eye on your leather. It can shrink if heated too quickly or even scorch from being left in too long.
Be forewarned...it can be a little smelly. Honestly, leather doesn’t smell great when you heat it. These warnings aside, this is a safe and viable way to dry your leather and can even help it maintain its shape!
Now that the leather is dry, flip them over and take a look! If you are happy with your leaves, you can move on to finishing! If not, you can wet the leather again and give it another go. Just follow the same process as before.

Put your leaves back on their forms to maintain their shape. To finish these, we are going to apply a coat of Gum Tragacanth to the back of each leaf (if you used veg tan, you do not need to do this step).
Grab a paint brush, or apply the gum with your fingertips. It does not matter how you apply, just be sure to get a nice even coat on. Once it’s applied, it should only take about 15-30 minutes to dry.


And there you have it, wet molded leather leaves for a simple autumn craft!
If you want to add more detail, or customize your leaves, go for it! If you used Veg Tan you could carve some veins in for extra details. If you used Chrome Tanned, you could paint some on. Or you can let the texture of the leather speak for itself.

Take your finished leaves and combine them with tea candles, pumpkins, gourds...whatever you think looks best, and arrange them on your table or your mantle. You could even punch a hole in these and turn them into a garland for your staircase or fireplace. It is entirely up to you!
This is just as easy as a paper craft, but the leather will hold up for much, much longer. Years even if they are stored properly each year. This could even be a fun autumn craft for kids cooped up around the house for the holiday!
If you make this project, post it on social media and tag us with #theleatherguymn! We'd love to see how yours comes out. Happy Making!